Sunday, February 23, 2014

Simple & Classic


I wouldn't consider myself to have a specific style but classic and minimalistic seem to always come up. Anytime I'm running late or just feeling lazy and I need to quickly grab something to wear, I always choose a simple tee & skinny jeans or a blouse & skinny jeans. The are my ultimate go to, especially because it is hard to go wrong with the two combinations. They just always look good. I have recently found some websites that I haven't heard much about but I think are great for people that like simple pieces.

I first came across ARY; they recently launched their website and let me tell you, I want EVERYTHING! From their sweaters to their jeans, I love it all. I love how their jeans are super simple. No harsh fading, no crazy rips and tears, just denim.

Somehow from there I found a similar site, Everlane. They also sell timeless pieces, my favorite their blouse. We have all probably seen those similar blouses for $150+, and at that absurd price I would never think about buying them. But with Everlane's less than $100 price tag, I think I might try some. They have a whole range of colors, my favorite being pine, truffle, and natural white (actually, I love them all!). What I like about their color range is that they aren't too over the top. They don't have crazy colors that are not practical. All of their colors are reasonable and are flattering on pretty much everybody.

And don't get me started on these sandals; they are perfect, everything I want (I don't have them, but I REALLY want them) in a sandal and more. The more part being that they are adjustable. I can't tell you how many times I have bought shoes online and they didn't quite fit right. With these I'm pretty sure they will accommodate for slightly smaller or slightly larger feet. As far as the style, they are great! Very practical for those that don't wear heels in their day to day life, but still want to look stylish (move over flip flops).

I'm not much of a ring person but I can tell you that this one is making me reconsider. A while back, a couple of years or so, I saw a ring similar to this in a magazine but the brand was not stated. I spent hours and days trying to find that ring but no luck. I had stopped looking for a while; then I saw this. I love the multiple band idea and I especially love that it looks like you are wearing 3 different rings. Unfortunately, at $253, it is safe to assume that I am not going to just casually add it to my cart, but hey it's okay to look, right?

P.S. This post is definitely a departure from my regular posts; do you like this better? I love beauty and fashion as well. Don't get me wrong, I'll still do nail polish posts, but I think I'm going to expand my range of topics that include beauty and fashion.

Monday, February 17, 2014

NOTW: Chinese New Year & Valentine's Day

 
I decided to paint my nails inspired by Chinese New Year (as well as the upcoming Valentine's Day - now passed) but didn't want to go super over the top. As you can see in the photo above, I went with dark grey nails and only a red & gold accent nail and overall, I'm pretty happy with the results. I'm not too happy with the dark grey as the main color but I do really like the gold and red together. I have to say though, the gold glitter does not like tape. It wasn't a catastrophe but it was troublesome. After removing the tape (my favorite nail art tool), I had to go back and fill in the part where the tape took off the glitter. Also, I don't know about you but the dark grey kept pulling tones of blue. It was subtle, but every time I looked at my nails I kept seeing blue.
 
Anyways, this post is kind of a miscellaneous post but feel free to write in the comments if you have anything that comes across your mind.  

Sunday, February 2, 2014

Review/NOTW: Covergirl Copper Cappuccino

 
Let me first start off by saying Happy Chinese New Year! I actually have a 'sort of' festive manicure for Chinese New Year but that will be up next week. I wanted to put this post up before that one.
 
Okay, so this is a weird post because this polish is super old. I have had this polish for as long as I can remember. I actually think it used to belong to my mom, but I LOVE it! Because it is so old I was apprehensive about doing this post because I have searched near and far and can't find this sold anywhere. Nevertheless, I did want to post this because I want your input if there is any nail polish out there similar to this one.
 
To be honest, I'm not quite sure if it is in fact Covergirl. I assume the CG means Covergirl and I have looked all over the bottle and nothing.
 
   Review Time...
 
Consistency: very very good (especially for being years old)
 
Application: fantastic. For being really old, I didn't find that the polish was any thicker than my other newer polishes. Glides on like a dream, but the best part was that it was completely opaque in the first coat. I love polishes like this because I am not one to really enjoy the process. I know some people like this as a calming beauty routine, but I only like the finished product.
 
Color: another one that I was blown away with. The color is so multi-dimensional. There is shimmer in all the right places. Ranking just based on color, this polish is still one of my all-time favorites.
 
Longevity: good but not great. Lasted for a good amount of days but nothing spectacular.
 
How many coats: ONE!
 
Top Coat/Base Coat: Sally Hansen Mega Shine Top Coat / Julep Nail Therapy
 
7-Day Wear:  
 
 
Overall Grade: A+
 
Again, sorry if you had hopes to buy this nail polish. But if you have any recommendations of a polish similar to this Covergirl one, please let me know in a comment because I don't know how many more manicures I can get with the limited amount of polish left.


Tuesday, January 28, 2014

New Update!


Welcome to my new intro/title thing. I don't know what you call it but it is new and I love it. If you haven't already checked it out, using your cursor, hover over the tabs and a colored line should appear under the words. I'm crossing my fingers hoping that it works, so if it doesn't, please let me know.
 
Basically I spent the entire weekend with my eyes fixated to the screen. I've dabbled with coding before but never this intense. For those of you that are pro coders, this may sound pathetic, but I was quite proud of this accomplishment given that this was all self-taught. My experience with coding consisted of just putting some pictures in but I think I just reached a new level.
 
I had wanted something like this for a long time. I knew I wanted a very simple intro/title thing but also wanted color. So I search all over the web to find how to change images by hovering over things. Finally, I figured out how to do it, at least I hope. I don't know if there is a more simple way to do this, but either way it works. The way I did it was adding an image overtop the original (without the underline).
 
Anyways, this is just a simple and quick blog post to document this (in my book) accomplishment. Again, please let me know if it doesn't work for you or if it looks kind of wonky (*do people still use this word?)
 
x Katherine

Monday, January 27, 2014

D.I.Y. Light Box


Do you want professional quality photos without the professional price? This cheap alternative makes your photos bright, light, and most importantly shadow-less. Just find good natural light, make this simple light box, and shoot away!
A while ago I came across a post via Flax and Twine and knew instantly I had to make this. The materials were very simple, all things I could find in my house (no going to the store). I gathered all the materials and started. I will say that it definitely took longer than expected, probably the whole afternoon. The longest part was cutting the cardboard.
MATERIALS
< cardboard box >
< tissue paper >
< tape >
< scissors >
< pen >
< X-Acto knife >
< ruler >

PROCEDURE

With the cardboard box flat, on one side of the box, draw a rectangle with each side 1" from the edge. (* From the pictures you can see I did 1/4" and that was way too small). Repeat for 3 of the four sides, ignoring the top and bottom of the box.

Using an X-Acto knife, or similar blade, cut out the box

Repeat for the other sides, so only one side is left uncut (* You can use the scrap cardboard as a cutting board so you don't scratch your surface)

On a tissue paper, trace the scrap rectangle that you cut out. Cut 1" from the sides (like the 3rd picture). Repeat 3 more times

Cut the top flaps  of the box off. Set up the box, so that it is now 3D. With each of the 3 tissue paper rectangles, tape them on the box covering the cutouts. (* I forgot to take a picture of this part, but find a white paper and just tape the one side of the paper to the back side and the other side of the paper to the bottom side of the box)

That's it! Add a little brightening in Photoshop and you're done! 

~  ~  ~
This was my first D.I.Y. Tutorial and hopefully not my last. Taking the pictures and editing them was actually not that difficult. The most difficult part was probably explaining the step. So I apologize if each step was not that clear and that some steps didn't have an accompanying picture to follow along, but I hope you find this tutorial helpful. If you try this, don't forget to write in a comment below.  

Monday, January 20, 2014

Review: Essie Bahama Mama


Overall Grade: A
 
Consistency: very nice

Application: very nice as well

Color: these types of oxblood/maroon color are my favorite so I might be bias, but the color is AMAZING! Very true to color and on the nails it looks exactly what it looks like in the bottle.

Longevity: fairly good. Day 2 there was a small chip on my right hand but that was it. The seventh day it did chip more but I was doing a lot with my hands (DIY project requiring cardboard, an X Acto knife, tape, etc. - - upcoming blog post)

How Many Coats: probably 2 (*** my left hand has two medium coats while my right hand has one coat. I liked how one coat wasn't as dark and more of the red was apparent, but asking others, they like two coats better than one)

Top Coat/Base Coat: Sally Hansen Mega Shine Top Coat / Julep Nail Therapy (per usual, I don't tend to switch up my top coat and base coat very much)

7-Day Wear: sorry, I forgot day five and six, but I did get day seven. *Day seven was the first day I saw any chipping


Sunday, December 29, 2013

NOTW: Essie After School Boy Blazer & OPI Russian Navy

A month has passed since I posted my last blog post and I apologize for being inconsistent. Near the end of November my nails started getting very brittle and cracking, especially on my pointer and thumb nail. When December came around, my family was setting up the Christmas tree. In the process of setting it up, I got scratches all over my hands and the dry and cold weather was taking a big toll on my hands. I didn’t wear much nail polish. I recently acquired Essie’s After School Boy Blazer and I was really excited to try it out. I swatched the polish on a couple of nails but felt compelled to finish the rest of my hand. I realized that it resembled another polish of mine (OPI Russian Navy) and wanted to compare. I don’t know if you can tell but my middle finger has the OPI polish and the rest have the Essie polish.


The two look quite similar except for the fact that Essie’s is a flat color: just a really dark navy almost black polish while the OPI’s color has slight purple shimmer and not as dark.

Sunday, November 10, 2013

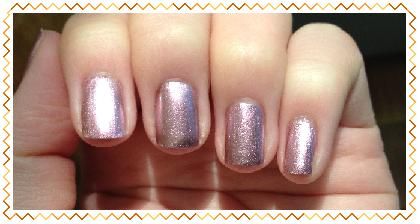
Review: Julep Maria

Consistency: nice and smooth

Application: Overall the application was easy BUT only if you work fast. If you work slowly, the polish drags and you don't get an even coat.However, it you apply the nail polish quickly with a steady hand, you only need to apply one coat and it is both opaque and even. Also, be careful of your brush strokes. With this nail polish, each brush stroke is very visible so be cautious and work quickly.

Color: This is one of my most unique polishes. It has a metallic look and is a really pretty color. I would say it looks like rose gold except more on the purple side than a rose side. I haven’t seen many colors like it; therefore I would recommend any one to try it just because of the color. 


Longevity: Whereas the nail polish did well on the other categories, the longevity is the reason this nail polish does not have an A grade. Even on the first day I noticed chipping. The edges wear off really quickly and probably will not last for a week.

How Many Coats: one average coat should be sufficient

Top Coat/Base Coat: Sally Hansen Mega Shine Top Coat/ Julep Nail Therapy (+ Sally Hansen Miracle Cure)


7-Day Wear: To be honest, I have only worn this nail polish for two days, so in this post there is not going to be a 7-Day Wear. (Even at 2 days, I could see chipping and worn edges)

You can get it HERE on Julep.com for $14.00 (Currently on Sale: $7.99) 

Overall Grade: B+