Monday, October 20, 2014

A Shortened Day


Super sorry about being MIA for so long. If you have been following me on Instagram or Twitter, you might know that I haven't dropped completely off the face of the earth. School has really gotten to me these past weeks. Midterms are in session. The thing about midterms in my school is that they aren't just one week; they basically stretch over a month. I had some midterms two weeks ago, a paper due last week, and two more midterms this coming week.

-----

Finally, I am here posting up day 3 of London. Not many pictures of that day.

First stop: Buckingham Palace (for some reason the changing of guards did not happen that day. I had thought they changed guards every day.)


Decided to go to Covent Garden. Don't remember exactly what I got but let me tell you this meal was memorable (not in a good way). I ended up getting a terrible allergic reaction. My throat started itching and swelling. We went to the nearest Boots and got Benadryl. It wasn't very effective so we thought it would be best to go back home and play the waiting game.


After sleeping for a couple of hours, waiting for the swelling to go down, we went back out into London. We ended up going to an Italian restaurant. I got a pizza (shown below). The flavors were insane. As you can see, there are bacon, cauliflower, and mozzarella cheese all on the pizza. Initially the taste was very unique, but after the second slice it felt very heavy and heart-attack prone.

Thursday, September 11, 2014

A Different Perspective


Day 2 was a big day. After taking it easy the first day and getting a good night's rest, we woke up and started the day early. Here is a summary of Day 2 in pictures.

-----

Taking the escalator down to the tube

British Museum

Inside the British Museum

Vintage Tiffany Cash Register at the British Museum

Rosetta Stone (sorry for the glare)

Hieroglyphics on a tomb

 Outside the Museum

London Streets

Buildings

Passed by this umbrella building

Red bus drove right in front of my shot (but hey, classic British bus close up!)

The Tube

Big Ben

London Eye

Palace of Westminster & Big Ben (check out that girl in the corner)

London Eye & London County Hall

London Eye close-up

Look from above


The Thames River

Coming back down in our little pods

Mr. Whippy cone (sorry, didn't realize the image wasn't focused)

There was a love festival going on


There was a professional camera crew filming something. Not sure for what.

Globe Theatre from outside

More London Streets


Dinner (Shepard's Pie with Mashed Potatoes)

End of Day #2. Keep checking in for recaps of the next days

Monday, September 1, 2014

Hello London!


Happy Labor Day and 1st of September!
Whether you are outside sunbathing, enjoying the weather before it starts to get cold, or are taking advantage of all those Labor Day sales, I hope you are having a fantastic day. For me, well, I am beginning the day on a cramped bus with all my things on my lap for a few hours. The rest of the day I have to do last minute homework before school.

If you follow me on Twitter, you might have seen me hint at a little vacation. Well about two weeks ago, I went to London for the first time. Here are some pictures and little descriptions that recap Day 1 of London.

-----

Riding the Tube into London from the airport

In South Kensington for a Lebanese brunch

Granola & Yogurt (it had almonds in it so I couldn't eat it, but my sister and I switched meals)

Walked along the Thames River. View of the London Bridge.


Dinner at Cafe Rouge

Salmon cakes & 'chips'

Overall Day 1 was very relaxed. Didn't do that much besides walk around and eat. But after getting off a 10 hour flight, a relaxed day was well needed.

-----

Stay tuned for the rest of my London posts! It was a week long vacation so expect many more photos. I'm back at school now so again, I'm not sure how my schedule is going to work out but I will try my best to fit in some time to write these blog posts.

Thursday, August 21, 2014

Friendship Bracelet Basics & Tips

Last week I posted a DIY on a friendship bracelet. I thought I would go into more depth and show how to do the knots, explain some tips that I think will make the process go more smoothly, and share some things you should know before you start your own bracelet.


Basics

  • The 4 Knots
    • 1 - overview & specific
    • 2 - overview & specific
    • 3 - overview & specific
    • 4 - overview & specific
  • From the picture, you can see 2 knots being tied. The knots should NOT be tied together. The first knot should be pulled tight all the way, and the second knot should be pulled casually (not too tight, not too loose)
Tips

  • Consistency: Try to keep each knot even from start to finish. That will ensure a straight friendship bracelet and the knots won't all be different. If you start off doing loose knots, your bracelet will be wider and the individual knots bigger. If you start making the knots tighter later on, you will notice that the width of the bracelet starts to get thinner and the knots smaller. And that makes the bracelet look uneven and not professionally done.
  • Find your method: I usually try to go in a V pattern. So each time I will end in the middle knot. If that confusing hopefully the image below will help clear everything up. For me it is the easiest way to find where I left off especially if you take a break in the middle. Also I find that it keeps the bracelet straight.
  • Stay organized: The strings tend to tangle easily, so try your best to keep them separated. I would suggest working with pairs (it’s easier to untangle 2 strings than 3+).
  • Customize it: You don’t have to follow the exact colors of the pattern, or the one that I made. A tip that I can give is to either print out a black & white copy to the pattern and color it with your 4 colors or come up with a trick to remember the colors. For me the pink was the light pink, the greenest one was my green, white was my yellow because it was the lightest color. (did you know that if you highlight text with a yellow highlighter and make a black and white copy, it looks like you didn’t highlight anything?) The last one was a stretch: teal was orange.
  • Persistence: Starting is the hardest part. Mostly because initially your friendship bracelet won’t look like much and it might get discouraging. But keep going and soon you will start to see the pattern emerge.
  • Be patient: It does take a while. I have done friendship bracelets that have taken a few hours. And some that have taken a few days. The best advice I can give is to sit back, turn on the TV, and take some time to tie all the knots. It doesn’t take much brain power to make the bracelet; just time.

Thursday, August 14, 2014

DIY // Friendship Bracelet


Wow, haven't done one of these posts in a while. I'm back with another DIY. Friendship bracelets. I remember making so many of these when I was younger. However, they were all the same. Same V shape or diagonal lines shape. It wasn't until my sister showed me a website that opened my eyes to a whole new meaning of friendship bracelets. This site has as many variation as you can think off. The best part is that you can really customize them to your liking. Favorite colors, organization color, sport team colors, and even letters that can spell out anything you want.

The website is really cool in the fact that you can really go into the nitty gritty about what type of bracelet you want. How many strings? How many colors? Difficulty level?

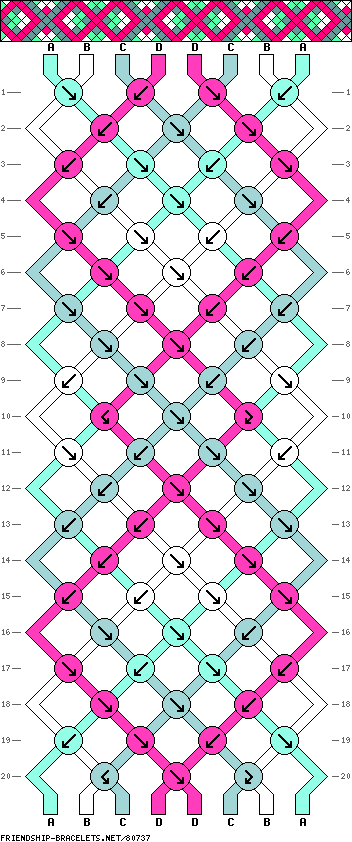
The pattern number I chose was #80737. I customized the bracelet by changing up the colors. This bracelet is slightly thinner than my usual ones. My favorite bracelets use 10-12 strings. This one was only 8 strings and you can definitely see a difference in the width. I would say that it was fairly easy to make. The only thing is that it takes a while to make. But if you are really committed, want to relieve a bit of stress, or are just bored, you will finish in no time.


On to the tutorial:

---------

Materials:

8 strings (I actually used 4; but more on that later)
scissors
binder clip (or anything that will keep you bracelet in place -- tape works too)
binder (or any surface that your bracelet will be on)
toothpick

Information:

Time: 2-3 hours (depending on how fast you work)
Strings: 8
Colors: 4
Difficulty: easy/medium

What To Do:

1. Pick out your 4 string colors. (I chose pale pink, green, orange, and yellow)


2. Measure an appropriate length for the strings of your bracelet. I don't have an exact measurement, but at the top of my head maybe 3 or so feet. It's always best to over measure than under measure, so make sure to have enough. (I once had to make a keychain instead of a bracelet because I didn't have enough string to wrap around my whole wrist). Cut 8 individual strings. 2 strings of each color.

**I changed things a little bit: I measured and cut only 4 strings of 6 feet or so. Keep reading to see why.

3. Tie a knot at one of the ends combining all 8 strings.


4. Braid a couple of inches. If you dont' know how to do an 8 strand braid, you can always combine the same colors and do a 4 strand braid instead

5. Tie a knot to end the braided section

6. Using the pattern below, Tie those Knots!


If those arrow are confusing, below are the arrows and a diagram about what they mean. I also included pictures of my own bracelet. (sorry, I forgot to take the last picture).


*From the picture you will see 2 knots. Do NOT tie the 2 knots in one go. Each knot is one little loop. Instead, tie one loop completely and then the next completely.*

7. When your bracelet can fit around your wrist fully tie a knot

8. Braid a couple more inches. Preferably the same length as the first braided section.

9. Tie one more knot

10. Cut the excess string

And you're done. Tie the ends around your wrist. Layer with some of your other bracelets and get that arm swag on!

-----

Okay, so my friendship bracelet looks a little bit different than what the steps describe. The general pattern is the same but the setup is different.

I used 4 strands each about 6 feet. Folding the strands in half I found the midpoint and did a 4 strand braid. (so basically there is a braid in the middle of the strings)


Fold to make a loop and tied it off with a knot


*You can do the loop without the braid if you want. I just think it looks a little better with the braid*

At the end of the bracelet I made 2 more braids. 2 4-strand braids. And finished with a knot at each end.


---

Whew! Kudos to you if you reached the end of this post. I know it was a long one, but there was a lot of things that needed to be covered and a lot of pictures that needed to be shared. Explaining something is actually hard when you don't have an image to show.

If you make this bracelet, please share. Or if you make a different one from the website I would love to see it.